


Key Takeaways
- A gravel garden is lower maintenance than a lawn or a conventional border, but it is not maintenance-free. Mowing and watering go away – light weeding, raking and top ups take their place.
- Weeds in an established gravel garden almost always germinate in the debris that settles on top of the stone, not in the soil below it. Blown-in soil, leaf litter and organic matter build a growing layer under the stones over time.
- Angular gravel holds its position in a planted bed better than pea gravel because the broken faces interlock. Rounded stones tend to roll, can migrate into the planting and needs edging to contain it.
- A gravel garden meant to self-seed cannot have landscape fabric under it. Fabric suits a set planting scheme where nothing needs to move, and dense planting is the best weed control everywhere else.
- Gravel keeps the soil surface dry around the neck of a plant, which is why Mediterranean and grey-leaved plants sit better in stone than in bark. Rot at the crown is what kills most of them.
- Pale stone reflects light back onto foliage and walls, brightening dull areas. It also grows algae fastest, so it is the wrong choice in damp shade if you want a low-maintenance feature.
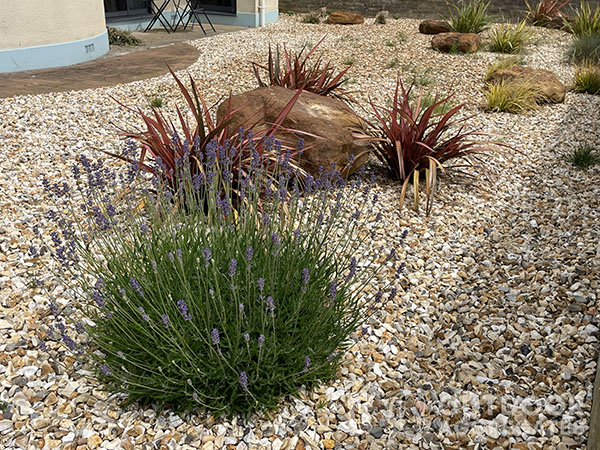
Gravel gardens go wrong on a schedule. Year one, it looks like the photograph that started it. Year two, the planting grows out and nobody gives it a thought. Year three is when the doubts creep in, and they are always the same: why has the stone gone green, where are these weeds coming from, and why has it sunk in that corner. What makes year three annoying is that by then almost nothing is easy to change. Every one of those problems was set in stone before anything was delivered.
So this page is not about how to build it, which is a separate job. It is the stage before: what you are making, what you are planting into it, and which stone you are pointing at. Get these right and the garden asks you for an afternoon or two a year.

Are Gravel Gardens Actually Low Maintenance?
A gravel garden is lower maintenance than a lawn or a planted border, but no gravel garden is maintenance-free. Here is the small trade-off. You lose the mowing, the edging and nearly all of the watering once the planting is established. You take on a spring tidy, an occasional rake, pulling seedlings while they are small, and a top-up every few years. On a small garden that is a couple of afternoons a year against a fortnightly job all summer. The people who end up disappointed chose gravel because they did not want to garden. Gravel does not solve that, it just minimises the chores.
The One Decision That Sets Your Workload
Every gravel garden is one of two designs, and choosing between them decides most of the work you are signing up for:
The self-seeding scheme. Plants are set into open soil with gravel spread around them as a mulch, and they are allowed to seed themselves about. Verbascums, red valerian (Centranthus ruber) and grasses will colonise the gaps on their own, and the garden slowly designs itself. There is no fabric anywhere in this scheme, because a sheet stops the seedlings rooting. The work is editing: pulling what you did not want, two or three times a season.
The set planting scheme. Plants go in deliberately, spaced, and the gaps stay as stone. This is where landscape fabric earns its place, because nothing is meant to move and there is no organic mulch rotting down into it. The work is lower, and the garden stays as drawn.
Pick one at the design stage. Trying to have both is where people end up cutting slits in fabric every spring and wondering why it looks patchy.

Why Weeds Appear in Gravel
Weeds in an established gravel garden nearly always germinate on top of the stone, not in the soil below it. The mechanism is worth understanding because it changes what you do about it. Wind-blown soil, leaf litter, dead foliage and the fines that wash out of the stone build up a thin growing layer in the gaps between the pieces. That layer is soil, for all practical purposes, and anything that lands in it germinates happily. The membrane underneath is irrelevant to it. That is why digging up a sheet and replacing it buys almost nothing, and why the tidiest gravel gardens are the ones where leaves get cleared each autumn.
Gravel does suppress annual weeds coming up from below, at around 5 to 7.5cm and even. It has never controlled established perennial weeds like bindweed or couch grass, which have the reserves to push through. Those come out before you start, not after.

Reading Your Site Before You Design
A gravel garden wants full sun, shelter from cold wind, and ground that already drains, which rules out more sites than most inspiration photos admit. Three checks that take ten minutes:
- Sun. Count the hours of direct sun the area gets in summer. Under four and the Mediterranean planting that makes these gardens work will sulk, and pale stone will green up.
- Water. Watch where puddles sit after heavy rain and how long they last. A low corner that holds water for days is a frost pocket and a plant graveyard, not a gravel garden.
- Soil. Squeeze a damp handful. If it rolls into a sticky sausage you are on clay, and heavy wet clay is the one soil where I would not push a gravel scheme without a proper look at the drainage first. Land drains only help if there is somewhere lower for the water to go, which on a flat garden there usually is not.
None of this means clay rules you out. It means the design changes: raised beds of gritty soil sitting above the clay rather than pockets dug into it.

Choosing the Stone as a Design Decision
Stone choice in a gravel garden is a design decision and a maintenance decision at once, because shape controls whether it stays put and colour controls how it ages. Start with shape first, because it decides whether the stone stays where you spread it. Angular gravel locks into itself and holds its line against a border edge. Rounded pea shingle does not: it rolls, works its way into the planting and needs edging to contain it, which is worth knowing before you fall for it in a photograph.
Size is mostly about scale. Finer grades around 10mm read quietly and vanish under the planting as it fills in, which suits a small garden. Coarser grades up to 20mm hold their own presence and sit better against large stone. Where a design crosses ground you actually walk on, a path through the scheme or the strip beside a parked car, angular stone between 6 and 14mm stays firmest underfoot. Where the design wants cobbles or a feature stone as well as gravel, rocks in landscaping sets out which size goes where.
Colour is the part people get wrong from photographs. Pale stone reflects light back onto foliage and will genuinely lift a dull corner, which is the real argument for it. It is also the first to show algae, because a damp surface film in shade is what algae wants. In a north-facing garden I pick a darker granite or slate and save myself the scrubbing.
| Stone | Size | What it does in a design | Watch out for |
|---|---|---|---|
| Angular gravel | 6 to 14mm | Fine enough to read quietly and settle around planting, and firm enough for the parts of a scheme you cross | Sharp on bare feet, so not the one for a paddling pool corner |
| Angular gravel | 14 to 20mm | Heavier, more confident look that holds its own in a larger space or against big stone | Overpowers a small bed and swamps low, fine-textured planting |
| Rounded pea shingle | 10mm | Soft, informal and rounded, right for a cottage scheme | Rolls and migrates into the planting, so it needs edging to contain it |
| Slate chippings | 20mm | Flat plates that knit together and lie still; colour deepens when wet | Slick when wet, so keep it off slopes and anywhere you cross regularly |
| Pale limestone or marble | 10 to 20mm | Reflects light back onto foliage and lifts a dull corner | Shows algae first, so the wrong choice in damp shade |
Five Low Maintenance Gravel Garden Designs
The five designs below all keep the upkeep low, and each one suits a different garden, budget and appetite for gardening.
1. The gravel courtyard
Stone across the whole space, planting in generous groups rather than thin edges. Best in a small garden that gets sun most of the day. Keep to one colour of stone and let the plants do the work, because a small area broken into several materials reads smaller still. Upkeep is the lowest of the five.

2. The gravel front garden
The most common version, and the one most often done badly. Gravelling the whole frontage reads as a forecourt rather than a garden. Keep at least a third of it planted, run the stone around the parking and the path rather than over everything, and put the strongest planting where you see it from the front door.

3. The planted gravel bed
A border where the mulch happens to be stone instead of bark. The design for anyone who actually likes plants: full planting, stone visible between them for the first few years and barely visible later. Upkeep is any border minus the mulching and most of the watering.

4. Stepping stones through gravel
Slabs or setts set flush through the gravel, with creeping thyme softening the joints. This solves the one genuine complaint about gravel, which is walking on it in slippers or pushing a barrow over it. Set them at a comfortable stride rather than evenly spaced.

5. Gravel with pots
Stone as the floor, pots as the planting. The cheapest to set up and the easiest to change your mind about, which makes it right for a rented garden or a first attempt. The catch is watering, because pots are the one part that will never look after itself.

Planting for Less Work
Planting is what makes a gravel garden low maintenance, because plants that suit the conditions need nothing and plants that do not need everything.
The mechanism worth knowing is that gravel keeps the soil surface dry around the neck of each plant. Grey-leaved and Mediterranean plants rot at the crown in a wet British winter, and stone prevents that in a way an organic mulch cannot. That is the functional reason to choose gravel over bark here, not the look.
Think in roles rather than a shopping list. Structure from lavender, rosemary, cotton lavender (Santolina chamaecyparissus) and Cistus × corbariensis. Movement from grasses. Ground cover from creeping thyme spreading over the stone, which releases its scent underfoot. Colour from Convolvulus cneorum, Californian poppy (Eschscholzia californica) and red valerian, which revels in poor soil.
And the catch nobody mentions. Drought tolerant means drought tolerant once established, which is a different thing from easy to establish. A new plant in its first summer needs watering like any other. I plant in autumn where I can, so the roots get going over winter, and I soak every pot in a bucket for an hour before it goes in the ground. Plant dry and you will be back watering it all June.
Dense planting is also your best long-term weed control. Once the cover closes over, very little else gets a look in. The vulnerable window is the first two or three years, which is exactly when people conclude gravel does not work.

How Much Gravel Will You Need?
A gravel garden wants around 7.5cm of stone, which works out at about 7.5 square metres from one of our bulk bags. Two things worth knowing before you order. A bulk bag is not a cubic metre, whatever you read elsewhere; our bulk bags measure ~0.57 cubic metres. And deeper is not better, because past a point the stone stops holding a level surface and starts moving underfoot.
Our gravel calculator will do the arithmetic. Add extra if the ground is uneven, because the hollows take more than you think.

What It Looks Like After Three Years
The three-year mark is when a gravel garden either settles into itself or starts looking tired, and which one you get was decided at the design stage. The settled version has planting knitted together, stone visible in fewer places than it was, and a spring tidy as the main job. The tired version has a green film on pale stone, a debris layer in the gaps, and seedlings of things nobody chose. The difference is nearly always sun, stone colour and whether the leaves got cleared.
If yours is already at the tired end, none of it is terminal. Clear the debris out with a spring-tine rake, take out the perennial weeds by hand and root, top up the stone to bring the depth back, and get some new planting in. Rebuilding from scratch is rarely needed.
Next Steps
Once you have settled the design, the two decisions that follow are what goes under the stone and which stone you are actually buying. Our guide to what to put under gravel walks through the fabric-versus-membrane choice and where each belongs, and there is a full walk-through of the planting side in our rockery plants guide if your scheme leans that way. We carry the decorative stone range in the sizes and colours mentioned above, delivered on a pallet to the kerb, and the planting side, including how to get a plant through gravel that is already down, is in planting into gravel.
If you would rather talk your gravel garden through with a person, ring Outdoor Aggregates on 0330 043 7585. The office is open 7am to 7pm, seven days a week.
Have you ever put gravel in place of a lawn or a border? Which stone did you go for, and how has it held up since? Let us know in the comments, we would love to hear how it has aged.
FAQ
Is a gravel garden cheaper than paving?
A gravel garden costs considerably less than paving for the same area, because the material is cheaper per square metre and there is no cutting, bedding or jointing. The saving narrows if you need edging all the way round to hold the stone in.
Can you plant straight into a gravel garden?
Planting straight into a gravel garden works well as long as the roots reach real soil below the stone, so scrape the gravel aside, plant into the ground, then draw the stone back around the neck. Plants set into the gravel layer alone will not survive a dry summer.
What is the best gravel for a low maintenance garden?
Angular gravel is the best all-round choice for a low maintenance garden, because the broken faces lock together and it stays where you spread it. Go darker rather than paler in a shaded garden, since pale stone shows algae first.